

In the spirit of learning new tools and frameworks, I recently signed up to go through a small course provided by Rally Protocol. They are running an 8 week program whereby people like me are learning how to build mobile applications using React Native/Expo that interact with blockchains.
Over the course of the 8 weeks, we are learning about deploying smart contracts from mobile phones, account abstraction, and harnessing the capabilities of RallyMobile SDK to streamline wallet operations, and much more.
Before reading on about what has been built, lets take a quick look at what Rally Protocol is.
Rally Protocol is the full-stack infrastructure for for a mobile-first blockchain world. It serves as the accounts and transaction layer for blockchain based mobile apps.
It is comprised of two core components, RallyMobile and RallyTransact.
RallyMobile is the accounts layer. It enables on-device wallet operations for EOA accounts, offering secure EOA wallet generation, on-device storage, and optional cloud backup for recovery.
In addition to EOA wallets, ERC-4337/Smart accounts will soon be available to use with Rally. It will provide a developer-friendly API for creating and managing ERC-4337/Smart accounts directly from the mobile app, utilizing the EOA generated by RallyMobile SDK. Additionally, there will be a developer-friendly API for signing gasless transactions on mobile devices.
RallyTransact facilitates and powers gasless transactions. It introduces a fully hosted infrastructure tailored for gasless transactions, sparing users the complexities of managing their own Infura node, relayer nodes, or bundler. RallyTransact handles on-chain payments, alleviating the need for deploying contracts or keeping tabs on developer wallet balances, as Rally oversee balances, security operations, and smart contract maintenance.
Now although we did not integrate Rally in weeks 1 or 2, these first weeks will serve as a primer in preparation of the following weeks where we will be using Rally a lot more.
Now lets explore whats been learned in week 1 & 2.
Week 1
The first week of this workshop series was geared towards getting up and running with a new Expo app. The goal of this build was to create a mobile app with basic SIWE (Sign-in with Ethereum) and wallet signature generation. The source code for this build can be found here.
Once the dependencies are installed, we created context to wrap our app with in a file named DataContext.tsx. This is where we will provide the application with the ability to set and retrieve the message to sign, along with the signature (data).
// context/DataContext.tsx
import React, {
    createContext,
    useContext,
    useState,
    useCallback,
    useMemo,
  } from 'react';

  interface DataContextProps {
    message: string;
    updateMessage: (newMessage: string) => void;
    data: string;
    updateData: (newData: string) => void;
  }

  const initialContext: DataContextProps = {
    message: '',
    updateMessage: () => {},
    data: '',
    updateData: () => {},
  };

  const DataContext = createContext<DataContextProps>(initialContext);

  export const useDataContext = () => useContext(DataContext);

  export const DataProvider: React.FC = ({ children }) => {
    const [message, setMessage] = useState('');
    const [data, setData] = useState('');

    const updateMessage = useCallback((newMessage: string) => {
      setMessage(newMessage);
    }, []);

    const updateData = useCallback((newData: string) => {
      setData(newData);
    }, []);

    const contextValue = useMemo(
      () => ({
        message,
        updateMessage,
        data,
        updateData,
      }),
      [message, data, updateMessage, updateData]
    );

    return (
      <DataContext.Provider value={contextValue}>
        {children}
      </DataContext.Provider>
    );
  };
Next we've wrapped our app in the DataContext provider, along with the WAGMI config.
// App.tsx
// .... other imports

// get projectId at https://cloud.walletconnect.com
const projectId = "<WALLET_CONNECT_CLOUD_ID>";
const chains = [mainnet, polygon, arbitrum];

const wagmiConfig = defaultWagmiConfig({ chains, projectId, metadata });

// create modal
createWeb3Modal({
  projectId,
  chains,
  wagmiConfig,
});

// wrap application with context, WAGMI config and Web3Modal
export default function App() {
  return (
    <DataProvider>
      <WagmiConfig config={wagmiConfig}>
        <Web3Modal />
        <View style={styles.container}>
          <NavigationContainer>
            <View style={styles.container}>
              <Navigation />
            </View>
          </NavigationContainer>
          <Toast />
        </View>
      </WagmiConfig>
    </DataProvider>
  );
}
Now that the application is configured, lets take a look at the UI components needed to make this build work.
As you can see from the screenshot below, there are 2 main actions for this application. One being the creation of a signature, and the next being the verification of a signature.

Take a look at the following components and their source code:
Navigation.tsx - This is the file that renders the two tabbed components for creating and verifying a signature
Create.tsx - Where the message will be created
Verify.tsx - Where the signature will be verified
Once you log in from your mobile wallet, you will be able to generate a signature and sign it using signMessage provided to us by WAGMI.
In the "Verify" tab, the signature will be made available to verify using verifyMessage provided to us by viem. This will verify that the message was signed by the provided address and return a boolean based on if the verification was successful or not.
Now we have a simple (and working) sign in with Ethereum mobile application!
Week 2
The goal of the second week of this workshop series was to create a mobile app that gives users the ability to paste smart contract code into an input element, compile it with the required compiler version, and deploy that code to Polygon Mumbai. The source code for this build can be found here.
Similar to the code from week 1, we wrap our app with context, add the required dependencies and create some UI components.
Alongside signing in with a wallet, there are 3 steps in the flow for this build:
Input Solidity smart contract code
Compile smart contract
Deploy smart contract
We will also need a server for when its time to compile and deploy the smart contract. This server listens on port 8000. In the code example, to make calls to the server we are using ngrok to expose the local development server, but you can replace the ngrok url with https://localhost:8000.
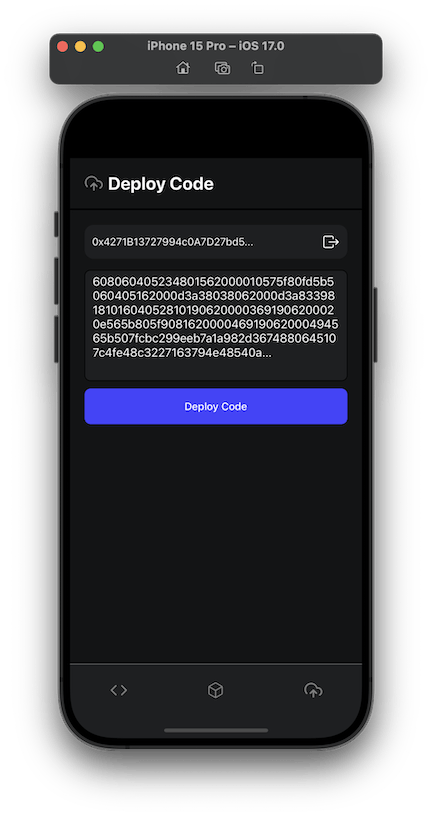
The first screen that is presented is for pasting your smart contract into. Once we have our code added to the input and click the cube icon we can then compile the smart contract. This is where the server comes into play. The bytecode and ABI is generated in the server based on the previously input code. Once compiled, it should look similar to the image below.

Next, the contract is ready and can be deployed. Clicking on the cloud upload icon will display the bytecode along with a button to deploy. For this to work, you will need to have a connected wallet with Polygon Mumbai tokens for deployment.
Heres a look at the code that deploys the contract:
const provider = await connector?.getProvider();
const encodedData = encodeAbiParameters(
  [{ name: "_greeting", type: "string" }],
  ["Hello World!"],
);
const fullByteCode = `${bytecode}${encodedData.slice(2)}`;

const tx = await provider.request({
  method: "eth_sendTransaction",
  params: [
    {
      from: address,
      data: fullByteCode,
    },
  ],
});
If you click "Deploy Code" there will be a prompt to approve the deployment and if everything works successfully, the smart contract will be deployed to the Polygon Mumbai network!
Conclusion
It has been a fun few weeks of building and learning. In the first 2 weeks of the Rally Protocol workshops, for the first time ever, I have:
Created my first React Native/Expo app
Created functions for wallet interactions
Created two apps that interact with a blockchain
Deployed a smart contract from my mobile phone
Over the next few weeks of workshops we will building apps that integrate and use RallyMobile SDK and RallyTransact, along with utilizing account abstraction.
Find out more about Rally Protocol here!