

MEM offers developers a secure and straight-forward way to authenticate users across multiple blockchains such as Ethereum, Arweave, Solana and more using molecule.sh. Using molecules eliminates the need for repetitive and time-consuming boilerplate code. It helps streamlines the authentication process, allowing developers to focus on the core functionalities of their applications without getting slowed down by intricate and redundant code.

In this walkthrough we will be building a simple registry with NextJS, Tailwind and MEM that uses the EVM molecule to verify a user's signature. Once verified, the user can sign the registry with their ETH address and name.
Getting Started
To get a quick start, clone this repo and install the dependencies.
MEM provides a CLI tool for quick and straight-forward deployment of serverless functions. This is what we will be using in this walkthrough. To install the CLI on your machine run npm i -g mem-cli-js in your terminal.
The Function
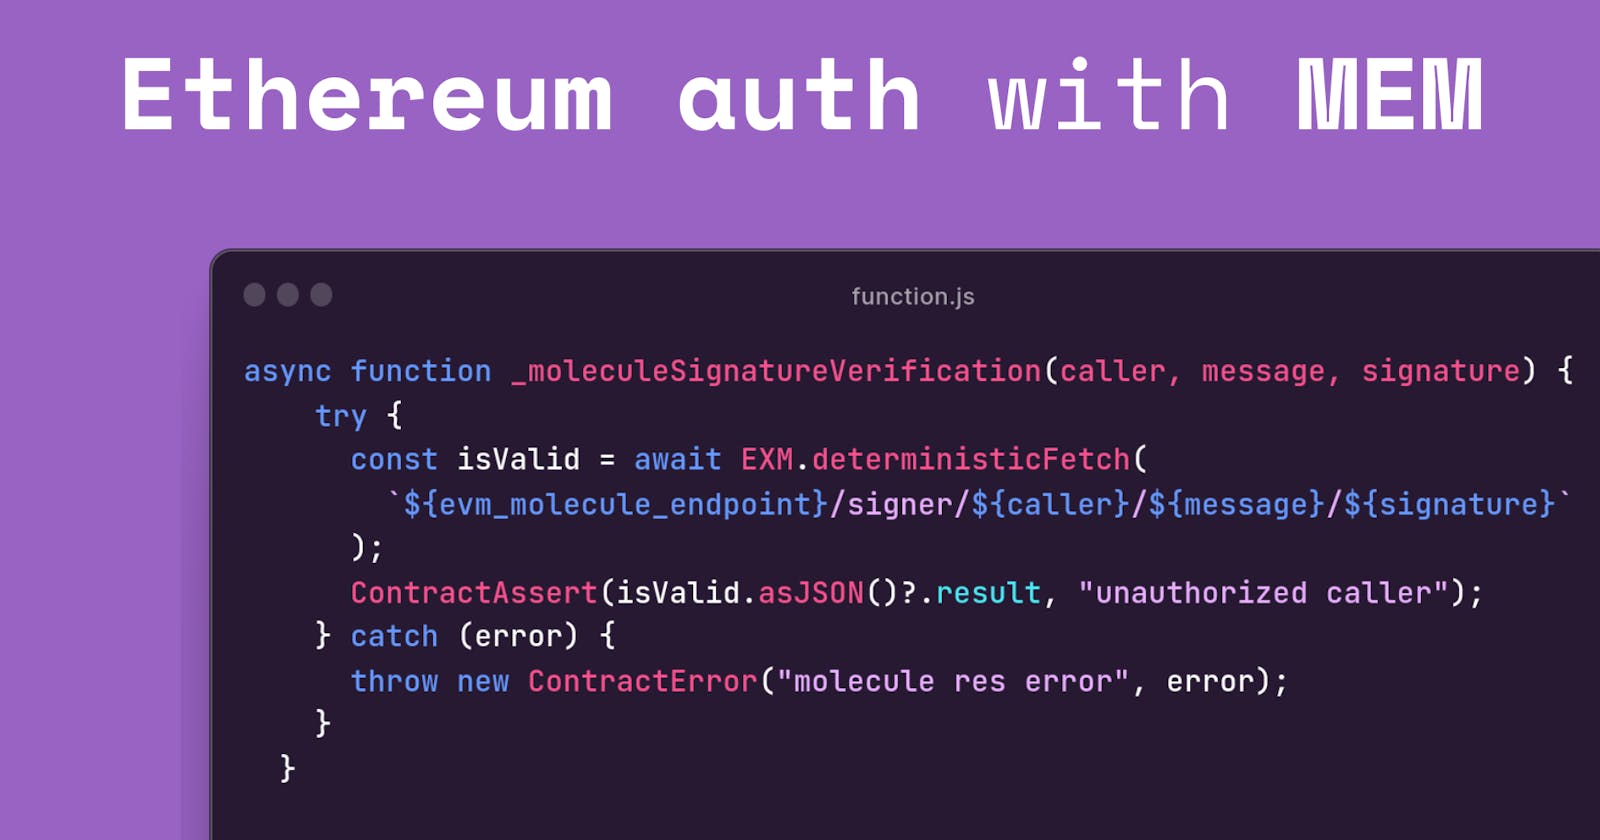
Navigate to app/function/function.js and take a look at the verification function, specifically the register function. It takes in a name, signature and Ethereum address. It then sends those values to the _moleculeSignatureVerification function provided by the molecule.sh library which will then run a check to verify the signature.
ContractAssert is a custom assertion function utilized within the provided function code, serving as a mechanism for parameter and validation checks. Its primary purpose is to evaluate specified conditions and, if these conditions are not met, to throw an error with a corresponding error message.
export async function handle(state, action) {
  const input = action.input;

  const names = state.names;
  const signatures = state.signatures;
  const evm_molecule_endpoint = state.evm_molecule_endpoint;

  if (input.function === "register") {
    const name = input.name;
    const caller = input.caller;
    const signature = input.signature;

    // params error handling
    ContractAssert(name.trim().length, "error invalid name");
    ContractAssert(!(name in names), "name already registered");
    ContractAssert(caller && signature, "missing required arguments");
    ContractAssert(
      !signatures.includes(signature),
      "error signed message used"
    );

    // creates a Base64-encoded ASCII string of the verification message
    const message = btoa(state.verification_message);
    await _moleculeSignatureVerification(caller, message, signature);
    // pushes message signer to names if verified
    state.names[caller] = name.trim();
    // adds signature to signatures array if verified
    signatures.push(signature);

    return { state };
  }

  async function _moleculeSignatureVerification(caller, message, signature) {
    try {
      // verifies signature against MEM EVM endpoint
      const isValid = await EXM.deterministicFetch(
        `${evm_molecule_endpoint}/signer/${caller}/${message}/${signature}`
      );
      // throws error if invalid signature
      ContractAssert(isValid.asJSON()?.result, "unauthorized caller");
    } catch (error) {
      throw new ContractError("molecule res error");
    }
  }
}
Once a signature is deemed valid, the signing user will then be added to the function state.
Another potential addition to this function could be an array of Ethereum addresses (allowlist) which could act as a form of privileged users with special permissions. These allowlisted addresses can be granted specific privileges, such as the ability to execute administrative functions or access certain features.
You could add an "allowlist" array with some addresses to initial state, which would then act as the source of truth for the function. Here is an example of what that could look like in the function:
const allowlist = state.allowlist || [];
// Check if the caller is in the allowlist for additional privileges
const isAllowlisted = allowlist.includes(caller);
// Check if the caller is in the general allowlist
ContractAssert(!isAllowlisted, "Caller not allowlisted");

if (isAllowlisted) {
  // Do something
}
Initial State
The initial state serves as a foundation for the MEM function, providing the necessary parameters and configurations for secure and reliable function execution. As the MEM function evolves and users engage with it, the state may be dynamically updated to reflect the changing conditions and interactions within the application.
Each MEM function must be deployed with initial state. The initial state is a JSON object that consists of key/value pairs. Below is the initial state we will be using for this function.
{
  "names": {},
  // the verified users address and name.
  "signatures": [],
  // the array of verified signatures.
  "verification_message": "hello world",
  // the message that is verified against the molecule endpoint.
  "evm_molecule_endpoint": "http://evm.molecule.sh"
  // the molecule endpoint.
}
Deploying the function
For this function we will be using the MEM testnet. Please note that these instances are temporary and will be purged after 1-2 days.
To deploy your serverless function, run the following command:
mem deploy --src app/function/function.js --init-state app/function/state.json --testnet
Once deployed, a function ID will be displayed. When you have retrieved the function ID, in your .env.local add it to a variable named `NEXT_PUBLIC_FUNCTION_ID` . We will be using this in our queries to MEM for READ and WRITE.
Verifying Signature
Start your server and navigate to the host. Navigate to app/page.tsx and take a look at the flow. The first interaction from the user will be connecting and signing. The UI will display a connect button which once clicked will prompt a user to connect with Metamask and sign a message of hello world.
Once signed, the signature and user address will be added to registry state and the sendToMEM function will be called to send the set values to the MEM function. After a signature and address have been set, a text input element will display so a user can add the name of their choice to be added to the MEM function state. Once submitted the payload will be created and sent from the frontend to the backend.
const connect = async () => {
    if (typeof window != "undefined" && typeof window.ethereum != "undefined") {
      // create an Ethereum provider
      const provider = new ethers.providers.Web3Provider(window.ethereum);
      // obtains a signer from the provider
      const signer = provider.getSigner();

      let message: string = "hello world";
      // requests the user to connect their Ethereum account
      await provider.send('eth_requestAccounts', []);
      // get user address
      const address: string = await signer.getAddress();

      // generate a signature for the predefined message
      // using the user's Ethereum address
      const signaturePromise: Promise<string> = await window.ethereum.request({
        method: 'personal_sign',
        params: [message, address],
      });

      const signature: string = await signaturePromise;
      // obtained Ethereum address and signature are then stored in registry state
      setRegistry({
        address: address,
        signature: signature,
      });
    }
  }
Writing to the function
Firstly, we construct the payload as a JSON string, including the necessary parameters such as the function to execute register, the user's name, signature, and the caller's address. We then use Axios to send the constructed payload to the server through a POST request.
try {
    const response: AxiosResponse = await axios.post("/api", JSON.stringify({
      function: "register",
      name: name,
      signature: registry.signature,
      caller: registry.address
    }));
    // ensure status 200
    if (response.status === 200) {
       // fetch users with latest addition
       fetchUsers();
    }
} catch(err) {
    // handle errors if any
    console.log(err)
}
Once the request reaches the server, the function ID is retrieved from the environment variables and the JSON payload is parsed from the client's POST request. The options object is created which contains the parsed input data (body) and the function ID.
Next we create the POST request and send to the MEM testnet endpoint. The payload will point it to the register function which will then run the validation.
export const POST = async (req: NextRequest) => {
  let functionId: string = process.env.NEXT_PUBLIC_FUNCTION_ID || "";
  try {
    const body: Promise<NextRequest> = await req.json();

    const options: object = {
      input: JSON.stringify(body,
      function_id: functionId
    }

    const response: AxiosResponse = await axios.post(
      "https://mem-testnet.xyz/write",
      options,
      {
        headers: {
          'Content-Type': 'application/json',
          'Access-Control-Allow-Origin': '*'
        }
      }
    );
    const result: object = response.data;

    return NextResponse.json(
      {
        data: result,
      },
      {
        status: 200,
      }
    );
  } catch (err) {
    return NextResponse.json(
      {
        error: err,
      },
      {
        status: 500,
      }
    );
  }
};
Reading from the function
We utilize the useEffect hook to initiate the retrieval of data from the function as soon as the component mounts. The fetchUsers function sends a GET request to the endpoint with the function, specifically targeting the state associated with the provided function ID. The obtained user data is then stored in the component's state.
This asynchronous process ensures that the latest information from the function is integrated into the component's rendering, providing real-time updates and interaction with the function state.
 const [users, setUsers] = useState<object>([]);

  useEffect(() => {
    fetchUsers();
  }, [])

  const fetchUsers = async () => {
    const users: AxiosResponse = await axios.get(`https://mem-testnet.xyz/state/${process.env.NEXT_PUBLIC_FUNCTION_ID}`)
    setUsers(users.data.names);
  }
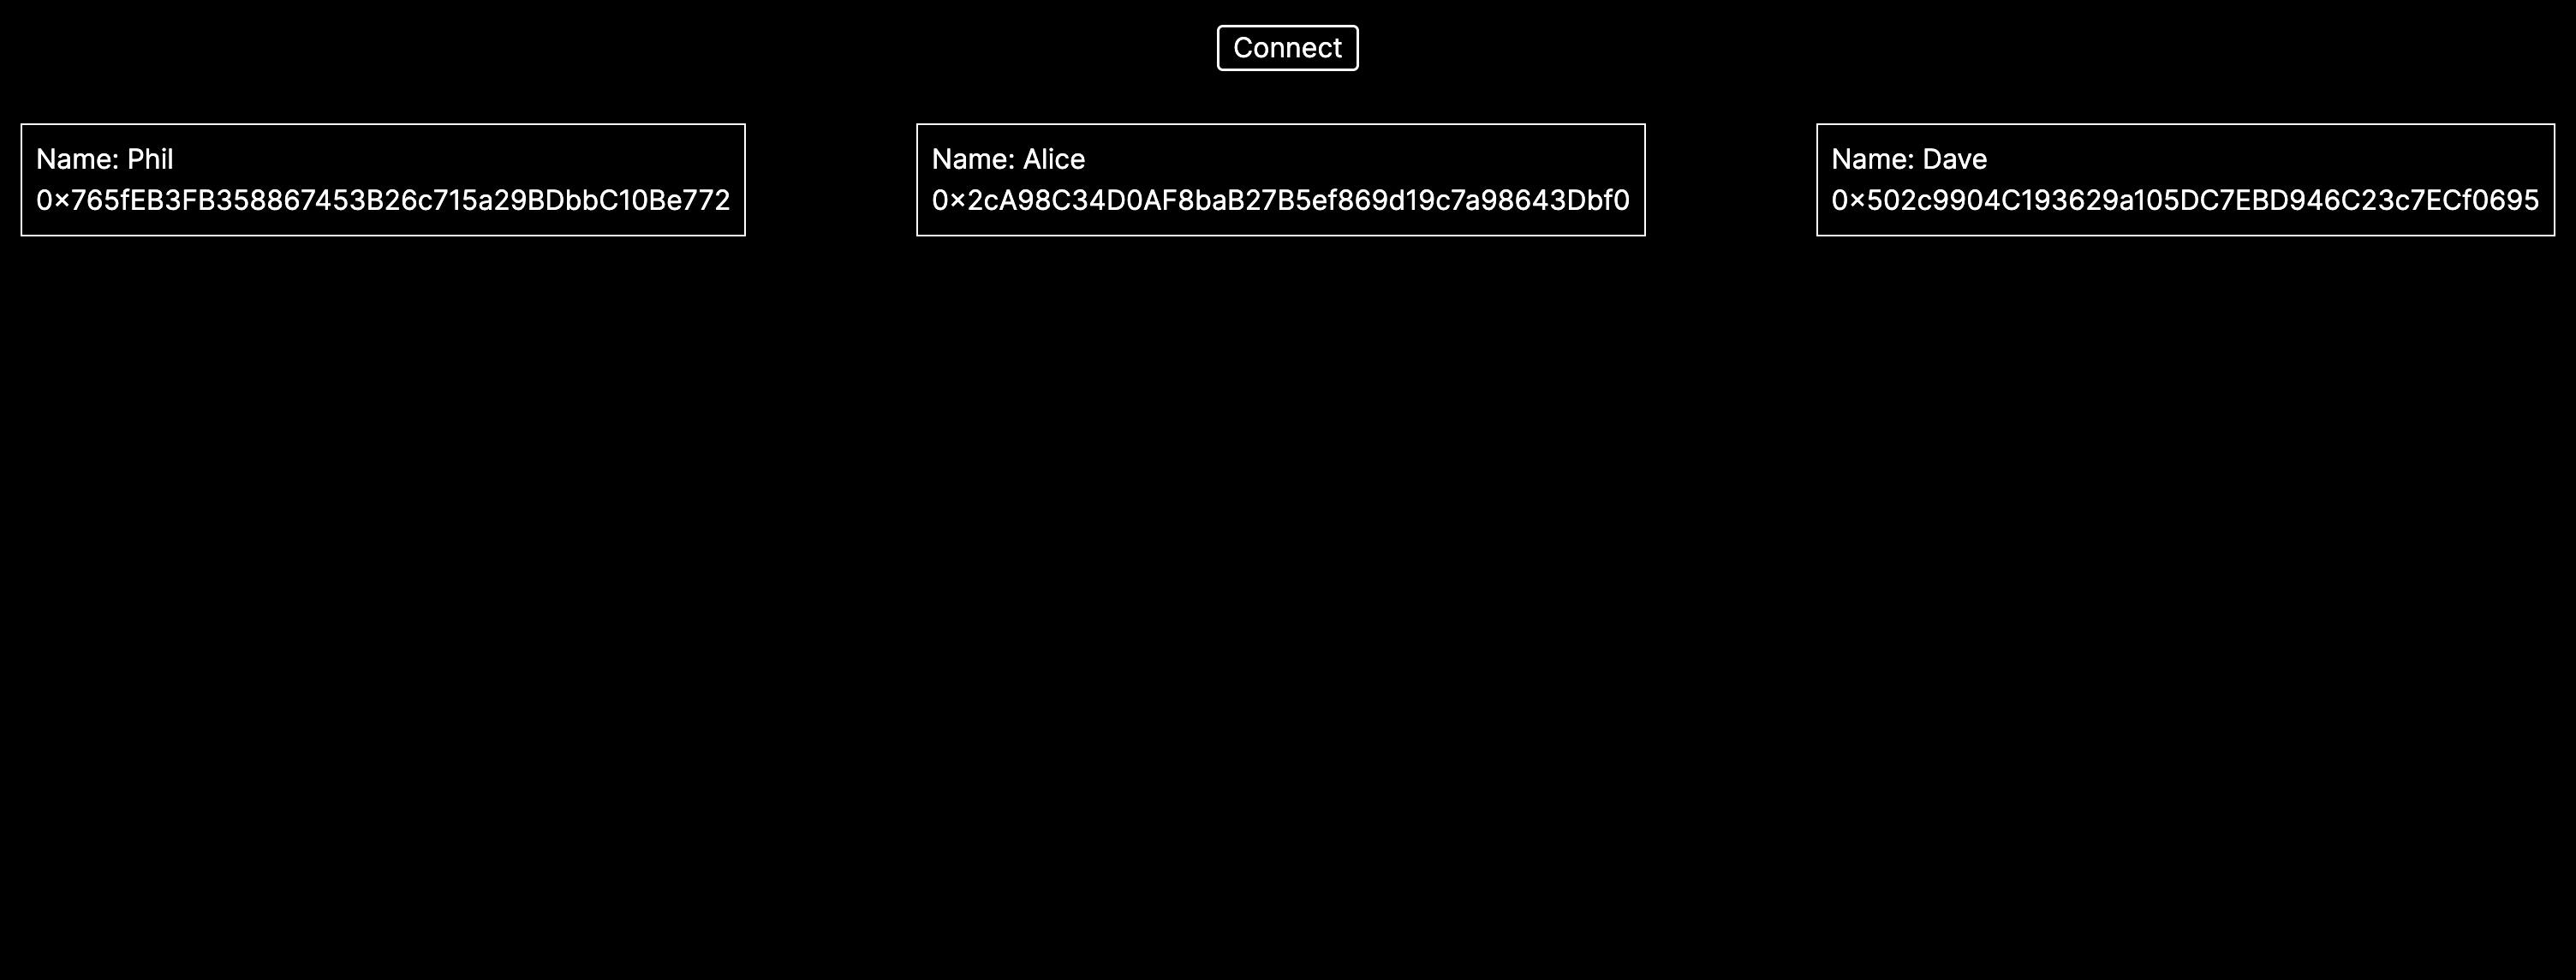
If there are signatures persisted to the function state, you will see a display similar to the one below, which shows all of the names that have been verified using the EVM molecule.
Conclusion
Combining EVM signature verification with MEM for registering users is just one example of how developers can leverage MEM and their provided molecules to streamline efforts to create secure and user friendly applications.
Signature verification, as a cryptographic method, ensures that each interaction is authenticated and tamper-proof, mitigating the risk of unauthorized access and potential malicious activities. The integration of signature verification adds an extra layer of security, using the Ethereum blockchain to confirm the authenticity of user interactions. This, along with with the flexibility of MEM serverless functions, creates a powerful and efficient system for management and access of user data for your applications. It allows developers to build trustless systems where user interactions are transparent, auditable, and resistant to unauthorized manipulation.
Additionally, using the use of MEM Carbon testnet instances offers a controlled environment for testing and experimentation. This not only facilitates a thorough evaluation of the function's behavior but also provides a safe space for developers to iterate and refine their code before deploying it to a production environment.
Click here to join MEM Beta.